
Paul (Nickname Killerx) did a great job with developing the GPO add-on for Firefox called GPOFirefox.
There are a couple of Extensions out there, that handle the interface between Firefox and the Registry. That’s in case all you need to do, if you add some of these admx files around for managing Firefox through GPO. Since Paul stopped the development of the Gpofirefox add-on with version 5 of Firefox there are some things, that this add-on can’t handle.
First of all, there are some differences between this add-on and other add-ons like for example the one of Frontmotion, which isn’t really a add-on. It’s kind of build into the so called Community Edition of Frontmotion Firefox. The Frontmotion add-on lacks at some point, when you need to change more settings than just the defaults like browser startup homepage, or proxy settings. If you only need these few defaults, I would recommend to use Frontmotions version, instead of any other, because Frontmotion comes with a customized admx file for all default settings in Firefox. The point, where this is not enough is when you want to change settings for example of an extension. Because Frontmotions admx file doesn’t support custom settings, so you can’t handle this.
Lets explain, how these GPO add-ons work.
Frontmotion offers an admx template that can be imported to your active directory gpo manager, to change all default settings. In the background, everything is done by writing some strings to the registry. Firefox reads these values and changes them locally in your running Firefox (about:config). That’s it. So, to test these add-ons, all you need to do is just open your registry editor and go to \HKLM|HKCU\software\policies\mozilla\defaultpref|pref|lockedpref (depending of kind of GPO add-on you are using). Here comes the gap.
Frontmotion doesn’t support any other values than the default settings of Firefox. Although this is really long list, but you are not able to control any setting that doesn’t belong to the default set of Firefox. Even if you set custom settings in your registry, they aren’t noticed! GPOFirefox does support these custom values, but lacks at some point as well. For example, if you want to use xmarks with your own server, you can set extesnions.xmarks.useOwnServer to true.
After putting it to the registry it looks like this:
Windows Registry Editor Version 5.00 [HKEY_CURRENT_USER\SOFTWARE\Policies\Mozilla\defaultpref] "extensions.xmarks.useOwnServer"="true"
This setting only applies to your Firefox (about:config) if it already exists in your about:config list. Otherwise it is dropped and you can spend hours to check your settings until you notice, that it is not provided to set not existing values. Why is that? GPOFirefox reads all of your values without any limitation. After reading, the add-on tries to change these values in Firefox. Because Firefox has different types of variables, (string, integer, boolean) it first reads the variable type (in your about:config list), to set the correct variable type and its value. That means, if your add-on tries to set a value that doesn’t exist in Firefox already, it can’t determine the variable type and wont write your setting to Firefox. Pretty uncool.
After extracting Pauls add-on I extended it to the ability to write a setting to Firefox even if it doesn’t exists. This is done by checking, if the value exists (like before) and if it doesn’t exists, the add-on tries to detect, what type the value is. If your setting extensions.xmarks.useOwnServer doesn’t exist, my code extension checks the value (in this case the value is „true“) and writes a Boolean preference to Firefox.
I stumbled across another problem, which is a bug in the add-on. If you try to set a Boolean value that is „false“, e.g. to turn off the telemetry stuff in Firefox the add-on sets this value to true. I think this happens, because the used function to create bool settings in Firefox needs an bool parameter and not a string parameter like the add-on uses. Maybe the setter function checks if the committed parameter is Boolean by checking it like „if (parameter) { write true } else { write false}“.
In this case every string is interpreted as Boolean:true and leads to this wrong behavior!
Because I don’t want to hurt any copyrights and to respect Pauls great work I only publish some instructions on how to extend the add-on by yourself.
First of all you need three Things:
– 7 Zip
– Firefox (my Version is 24)
– The gpofirefox add-on (https://add-ons.mozilla.org/de/firefox/add-on/gpo-for-firefox/)
1. Use 7Zip to extract the XPI File
2. Go to the extracted folder and open the chrome folder
3. Use 7Zip to extract the gpofirefox.jar
4. Delete gpofirefox.jar
5. Modify the file gpofirefox.js in <extracted-extension-folder>\chrome\gpofirefox\content\ (difference between original and modified)
6. Mofify <extracted-extension-folder>\chrome.manifest ( difference between original and modified )
7. Go to <extracted-extension-folder> and Select „chrome“, „defaults“, „chrome.manifest“, „install.rdf“ and use 7.ZIP -> Add new archive (zip)
8. Rename the created zip file to gpofirefox@extensions.org.xpi
9. Install your add-on (or copy it to extensions folder) Renaming and modifying the internal add-on structure is to simplify the add-on for further changes
Please leave me a comment. I’m actually thinking about creating an add-on like this with some further functionality like adding the ability to write to sqllite databases (popup blocking), replace / update files in the profile and so on. Everything controlled by the registry via group policy AD Things .
For testing purpose you can use a registry file like the below one.
Keep in mind, that these settings are only for the CURRENT_USER. If you want to set everything machine wide you have to rewrite the reg file to HKEY_LOCAL_MACHINE instead of HKEY_CURRENT_USER
Windows Registry Editor Version 5.00

[HKEY_CURRENT_USER\Software\Policies\Mozilla]

[HKEY_CURRENT_USER\Software\Policies\Mozilla\defaultpref]

"browser.startup.homepage"="intranet"

"browser.search.suggest.enabled"="false"

"browser.shell.checkDefaultBrowser"="true"

"browser.tabs.warnOnClose"="false"

"extensions.zotero.firstRun2"="false"

"signon.rememberSignons"="false"

"startup.homepage_override_url"="intranet"

"extensions.pendingOperations"="true"

"extensions.xmarks.username"="marco"

"extensions.xmarks.sync-tabs"="true"

"extensions.xmarks.syncOnShutdown"="1"

"add-on.disable_full_page_add-on_for_types"=""
[HKEY_CURRENT_USER\Software\Policies\Mozilla\lockPref]
"datareporting.healthreport.uploadEnabled"="false"
"toolkit.telemetry.enabled"="false"
"toolkit.telemetry.prompted"="2"
"toolkit.telemetry.rejected"="true"
"privacy.donottrackheader.enabled"="true"
"extensions.update.notifyUser"="false"
"browser.search.update"="false"
"browser.rights.3.shown"="true"
"extensions.blocklist.enabled"="false"
"extensions.autoDisableScopes"="0"
"extensions.zotero.firstRunGuidanceShown.saveIcon"="true"
If you want to add your settings to a GPO, open the Group Policy Management and edit your current / create a new GPO object. Now you have to choose if you want to create registry entries for user (user configuration) or computer (computer configuration). Afterwards choose [ Settings -> Windows Settings -> Registry ]. We decided to create two sub folders, one for locked pref and one for default pref, as shown here:
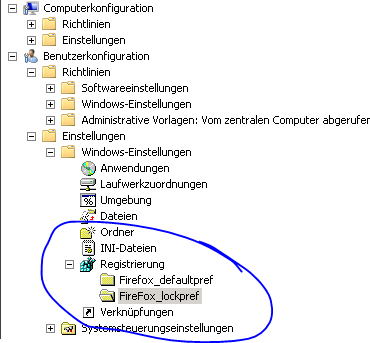
GPO Firefox Registry Settings
Next step: Create a new registry element at the right side. This could look like this:
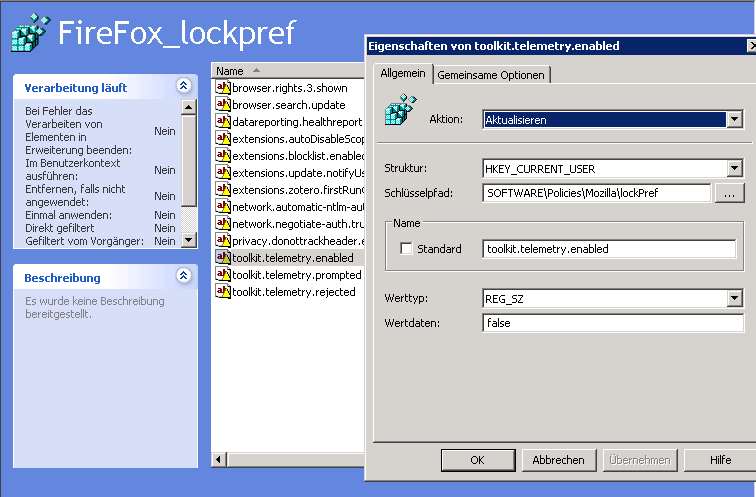
GPO Firefox Registry Settings
How about an ADM/ADMX file?
– If you want to use an ADMX file you have to create it from scratch.
– There are so many settings available in Firefox itself that it would take too long to create it.
– It’s not flexible enough, because every add-on has its own settings.
– If you add another add-on / update Firefox you maybe have to extend your own ADMX file.
These are the reasons why I prefer adding everything „raw“ to the registry. For deactivating some Firefox features you have to Google once, or check the prefs.js file changes These bugs are fixed with version 0.9.3 –